
How do I Import and Export transactions in Propio?
Propio makes it easy to manually upload additional transactions or export transaction records at any time.
📤 Exporting transactions
To export transactions into an Excel file:
Select the client from the dropdown menu at the top of the Transactions page.
Choose the correct tab depending on what you want to export:
Pending transactions
Categorized transactions
Excluded transactions
Click the Export button at the top left of the page.
✅ Propio will automatically download an Excel file with all the transactions currently displayed in your view.
📥 Importing transactions
To manually upload bank transactions from a statement:
Select the client from the dropdown menu at the top of the Transactions page.
Click the Import button on the Transactions page.
Select the Upload File option.
Choose the date range that corresponds to the statement you’re uploading.
⚠️ Note: You must upload one monthly statement at a time.Select the document type — choose Bank Statement.
Select a Bank Account:
⚠️ Note: It must be a manually created bank account. If you use an account already connected to the bank, it will generate a duplication of transactions: on one hand, those you import from uploaded bank statements, and on the other, those sent directly by the bank.
Steps to create a manual bank account:
In the Clients section, click on the client for whom you want to import bank statements.
Click on Bank Details.
Click on + Add new account.
Select the second option “Add manual account” and complete the required fields.
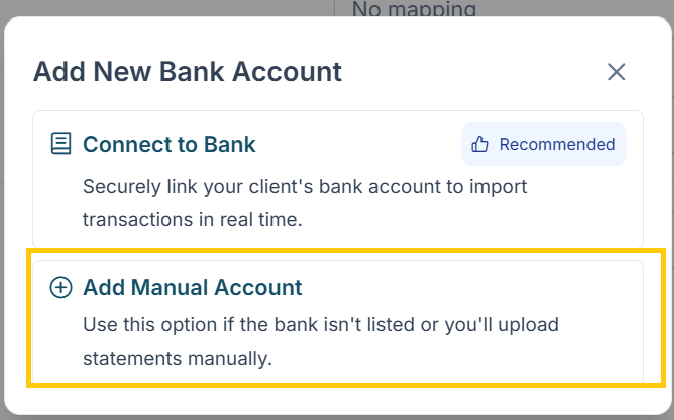
Click on Create.
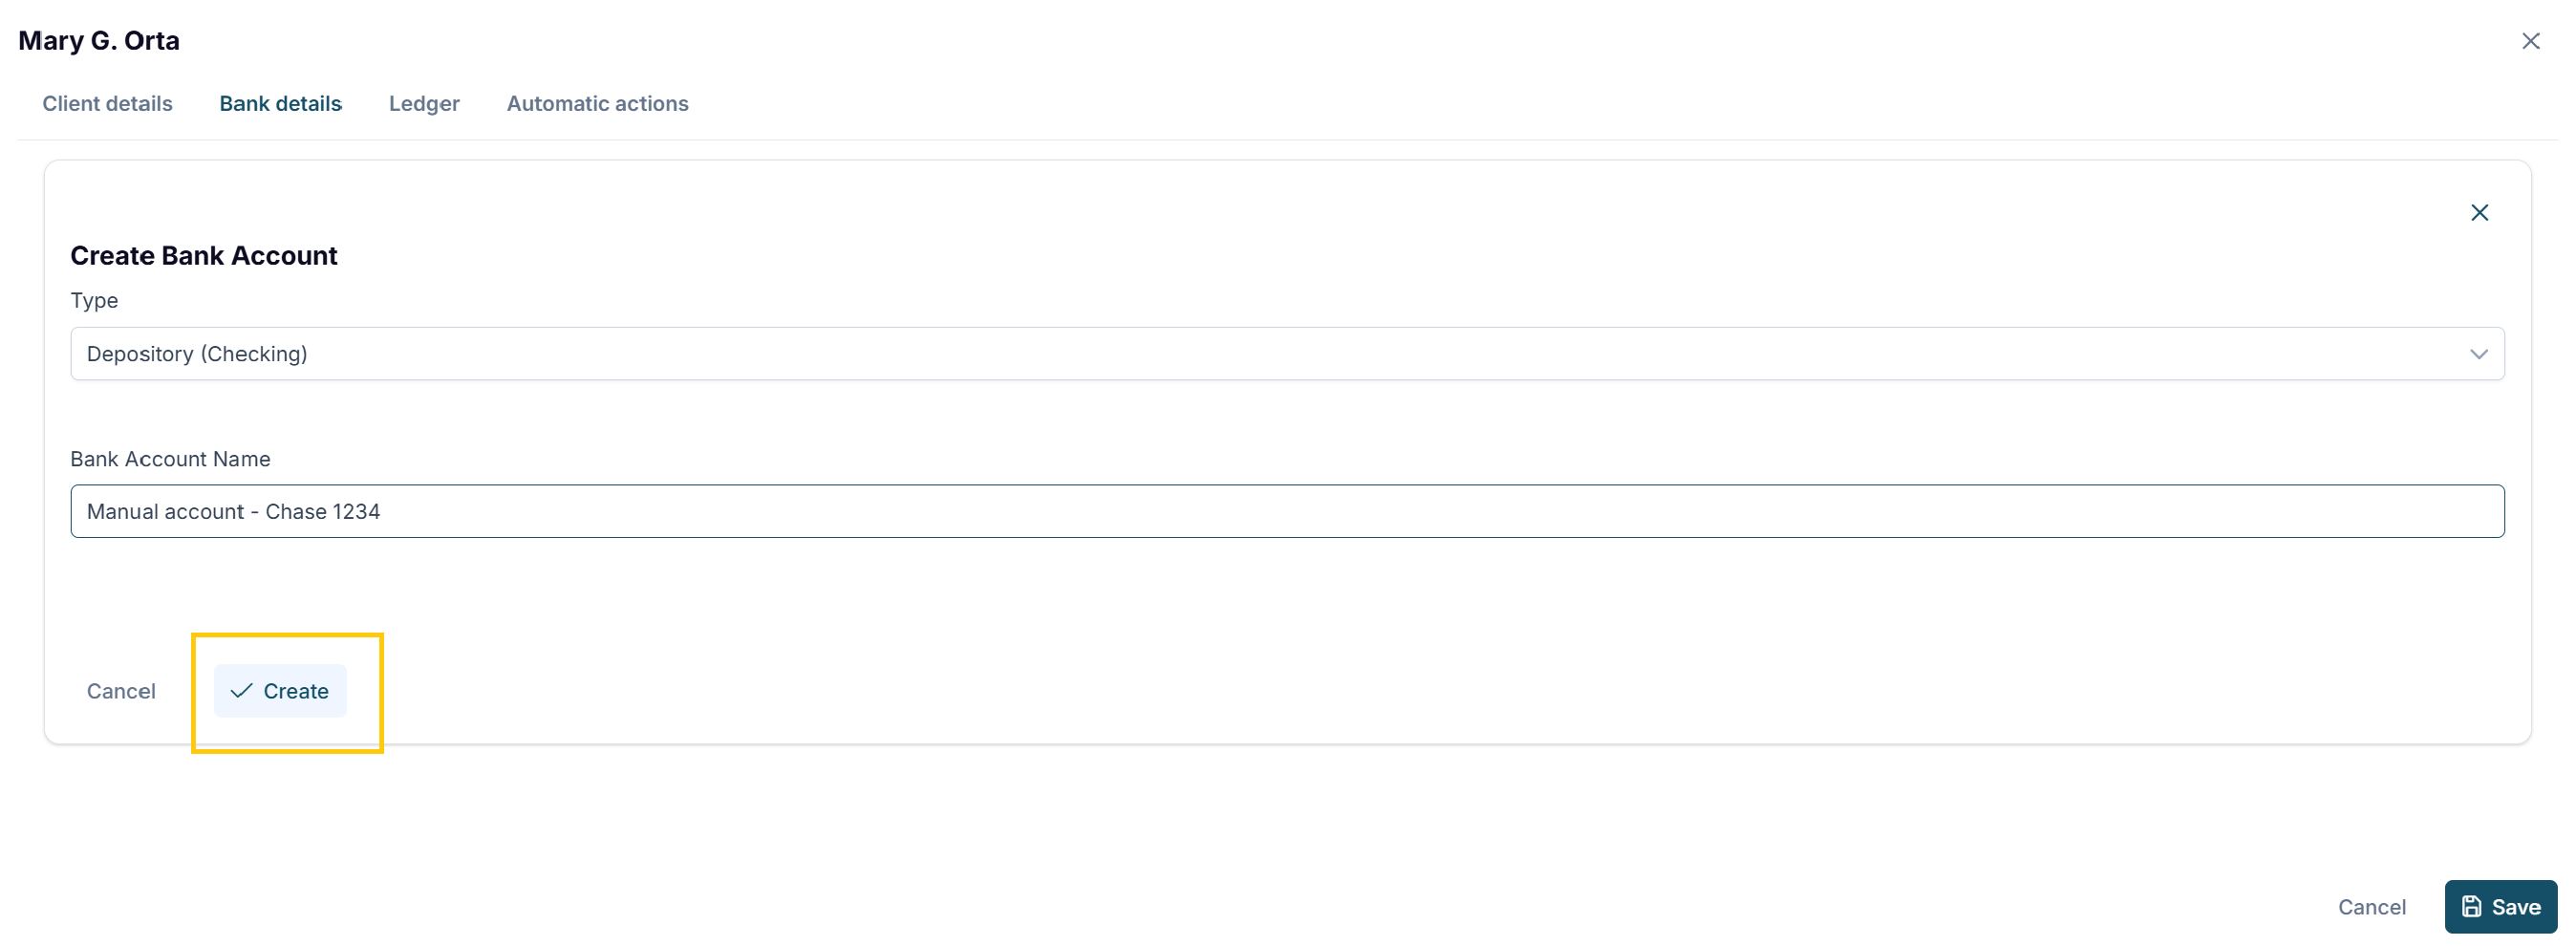
Done. You can identify these accounts by the word “Propio” at the beginning of the name (example: Propio - Chase 1234).
In contrast, accounts directly connected to the bank do not include the word “Propio.”
Continue with the import steps, step #7:
Click Select File and upload the PDF from your device.
Click Upload File to complete the upload.
Wait up for Propio to process the statement.
You’ll receive an email notification once the statement is processed and available.
After you receive the confirmation email from Propio that your transaction upload is ready —a process that can take between 10 minutes and 48 hours, depending on the number of transactions in the bank statement— follow these steps to complete the import:
1. Go to the Transactions section
Log in to Propio.
Navigate to the Transactions section.
Select your client.
Click the Import button again.
Here you will see the status of the statement upload.
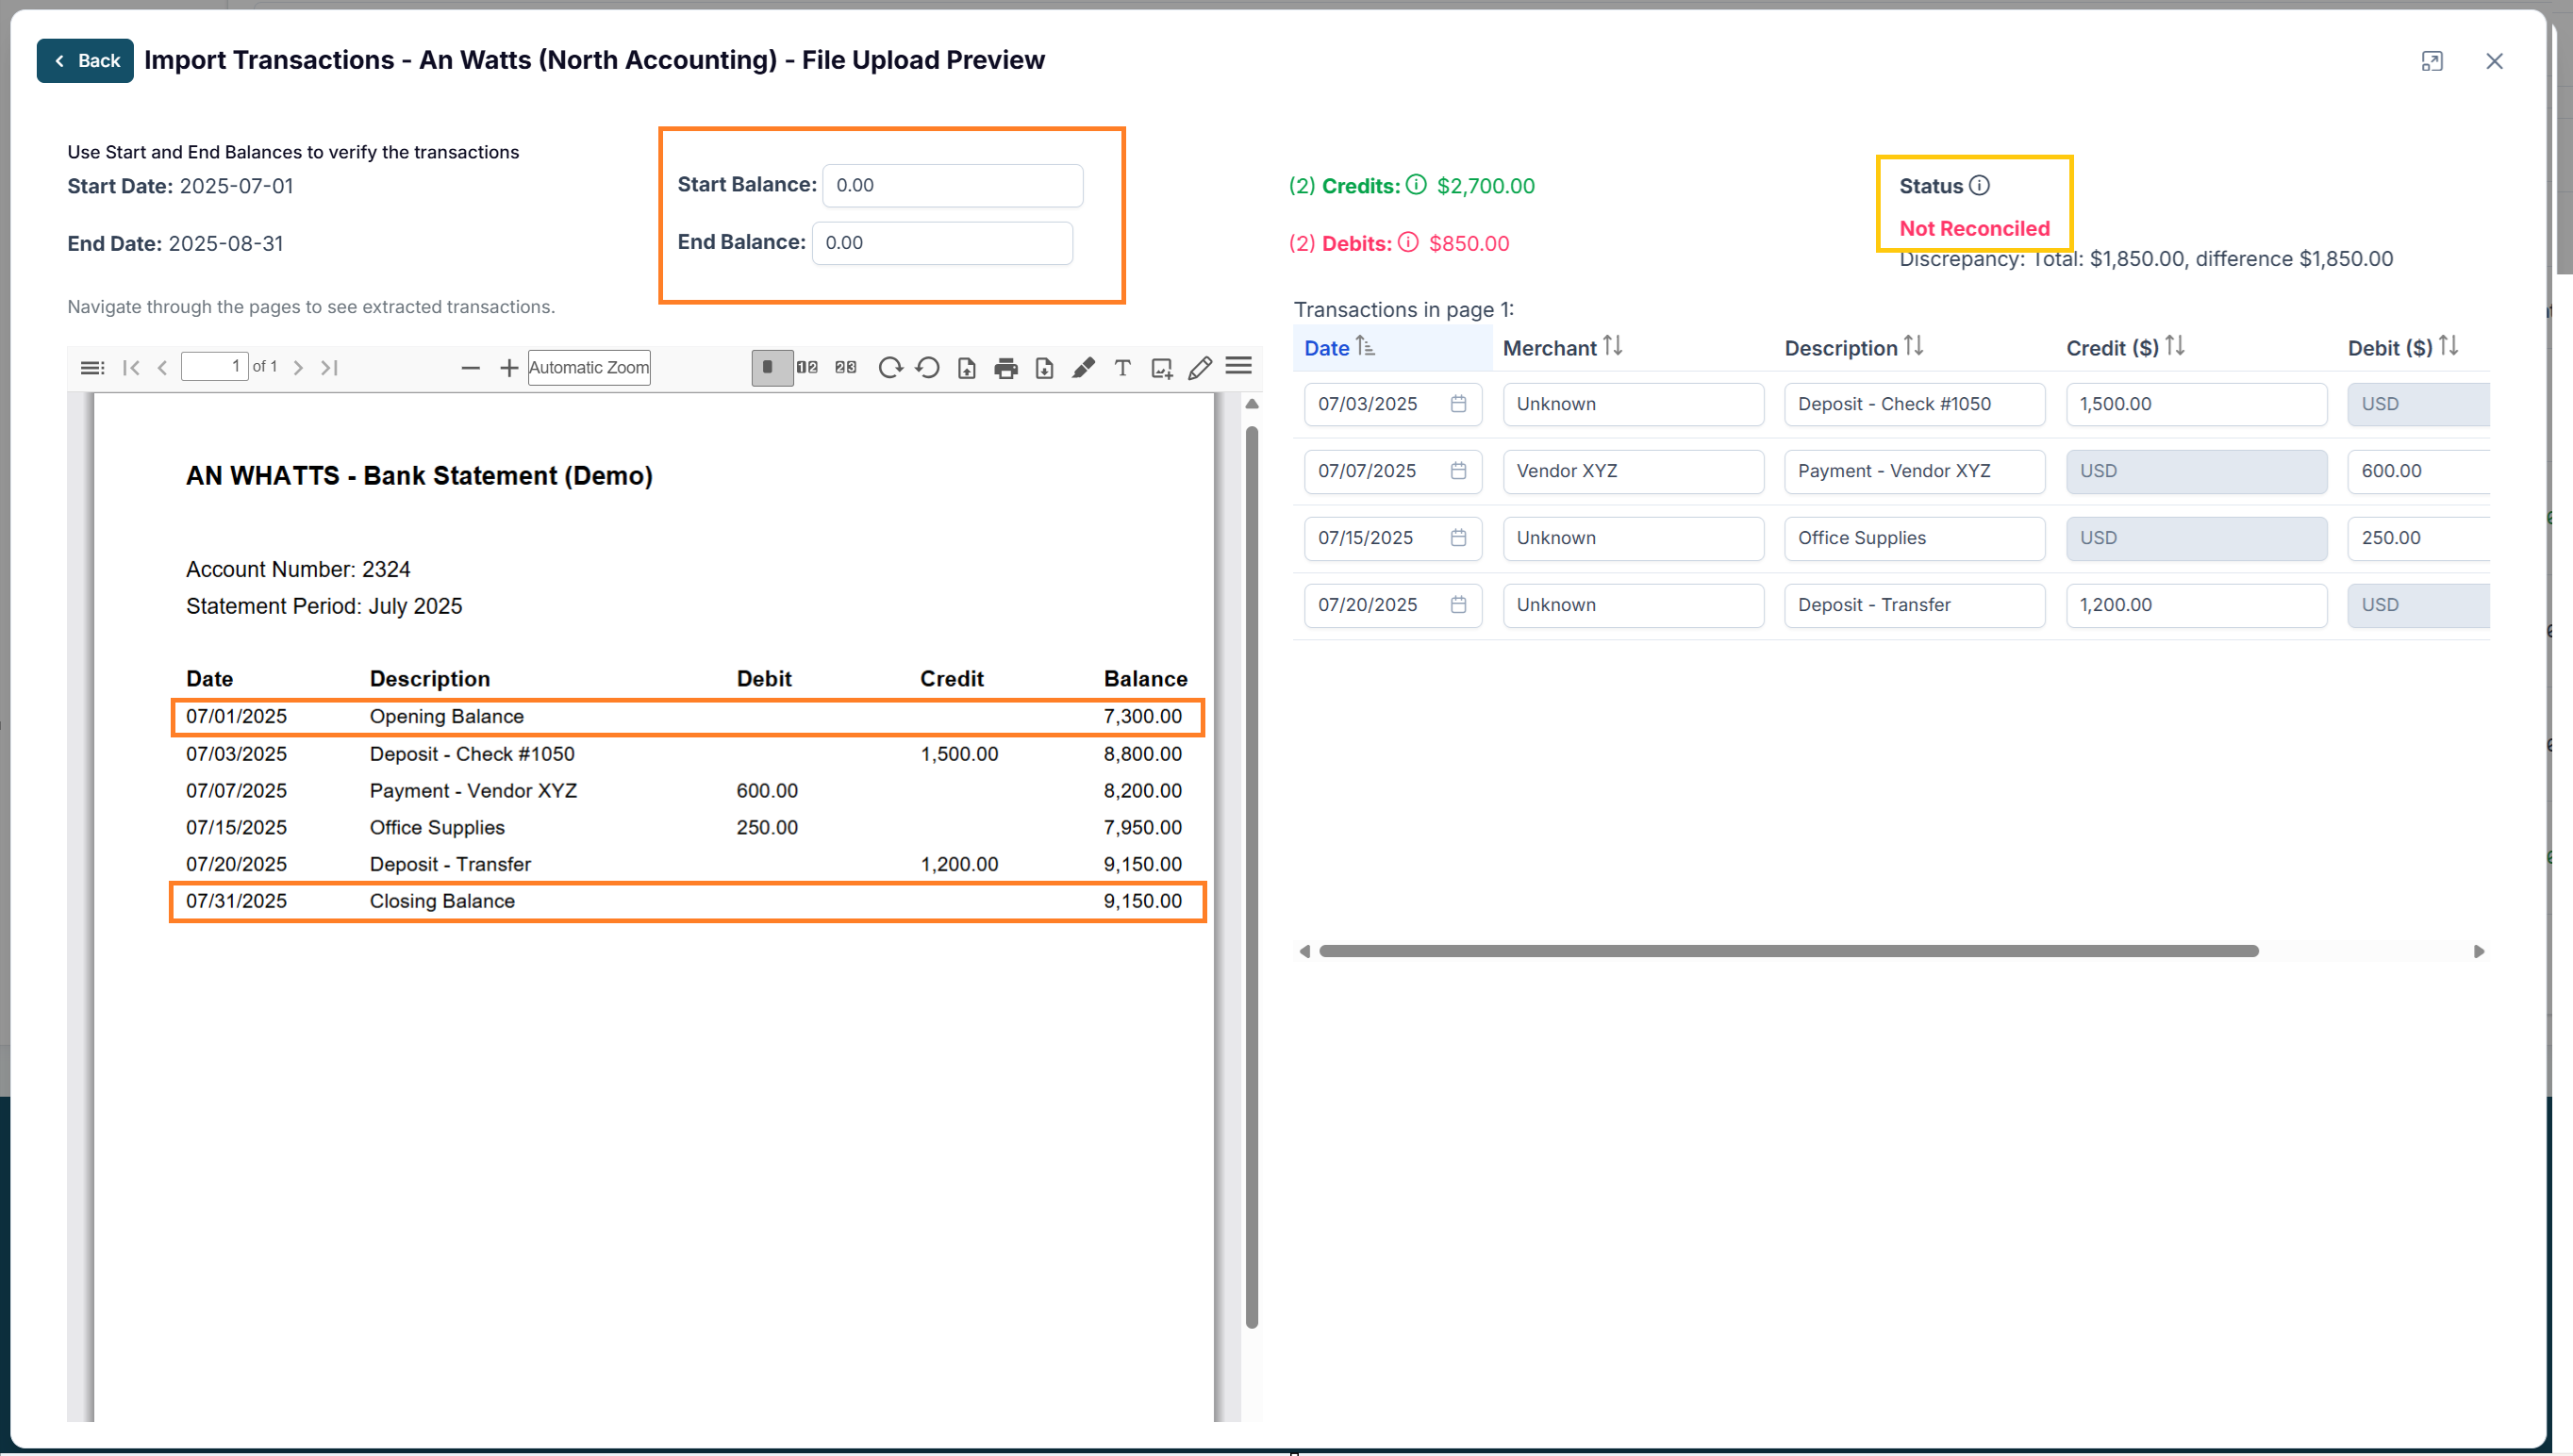
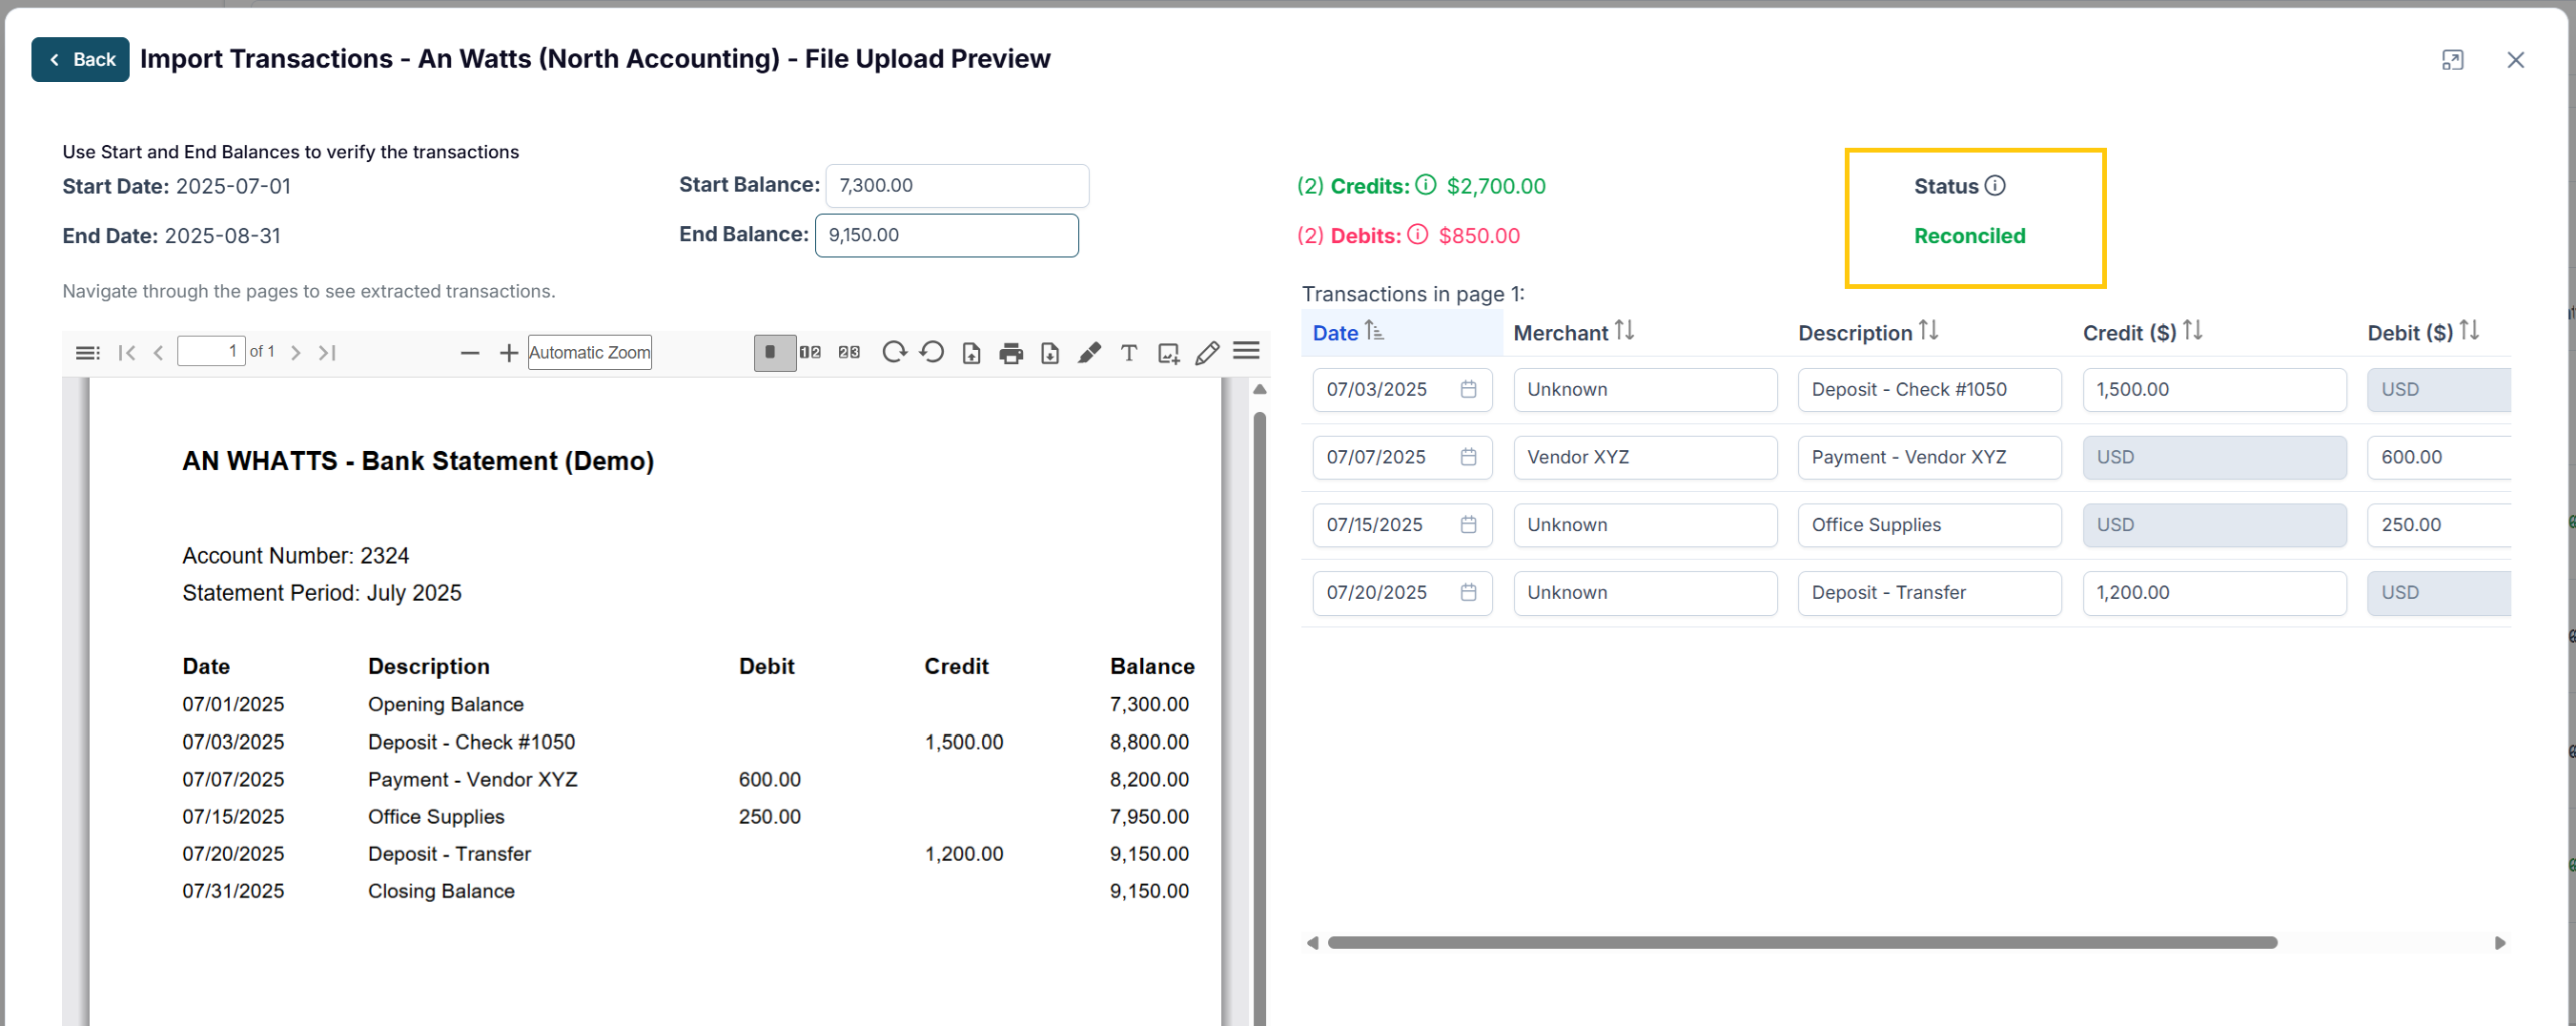
2. Review the Preview
Click View Preview at the bottom of the table.

You will see:
Left side: the bank statement you uploaded.
Right side: all the transactions extracted from that statement.
On the right side, you will also see the status of the statement in Propio (Reconciled or Not reconciled). This allows you to confirm that the extracted transactions are accurate.
3. Edit or adjust transactions if needed
In the right-hand section, you can:
Edit transactions.
Delete transactions.
Add new transactions manually.
4. Enter beginning and ending balances
Propio will ask you to confirm the beginning and ending balances for the month you are uploading.
These values appear in your document shown on the right side.
Delete the default zeros and enter the correct balances.
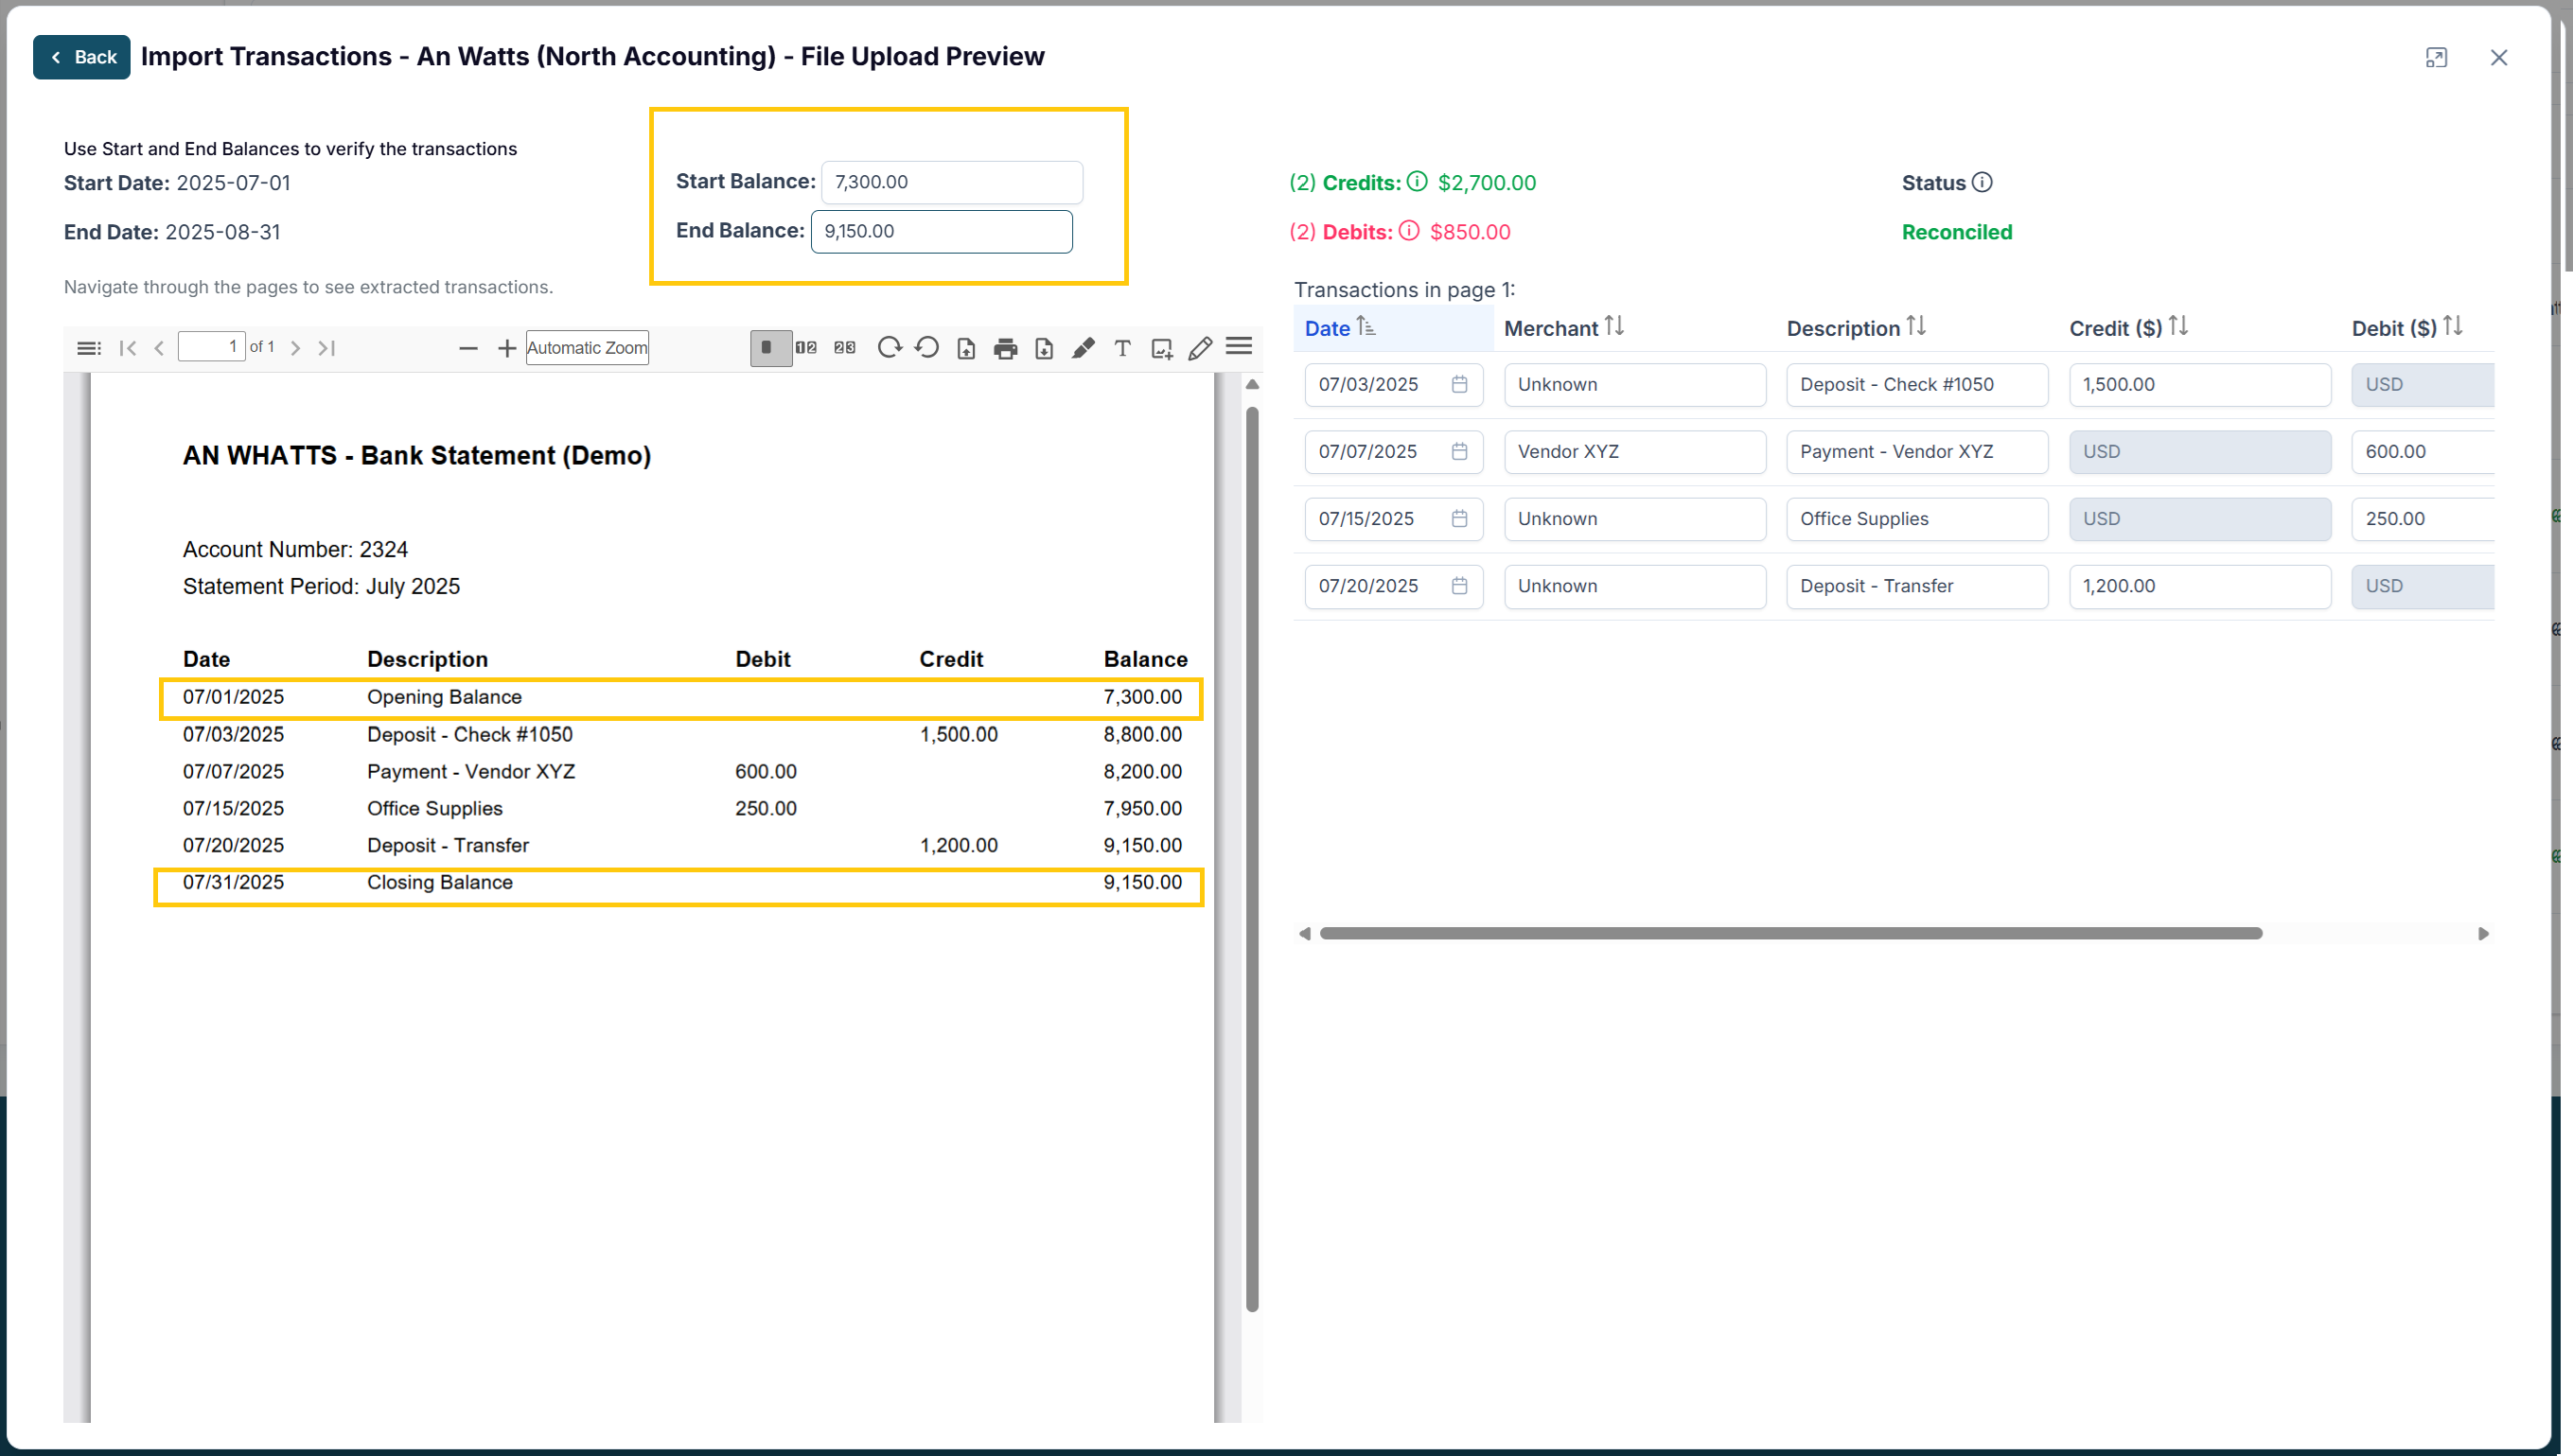
5. Verify the reconciliation status
Review the status again.
If it shows Reconciled, click the Finalize Upload button.
6. Confirm the import
The transactions should now appear in your client’s transactions page.
If they don’t:
Refresh the page.
Confirm that the dates of the uploaded bank statement are after the accounting start date you selected when creating the client.
Ensure that the Catch Up service is enabled, which allows you to import more than 90 days of transactions.
👉 With these steps, your transactions will be ready in Propio for review and categorization.
🔽 Continue Learning
← Back: Understanding the Transactions Page in Propio
← Back: How do I search for and filter transactions in Propio?
← Back: How do I categorize and manage transactions in Propio?
← Back: How do I manage Transfer transactions between accounts in Propio?
Next → How do I edit an existing Chart of Accounts?